Skip to content

2020

Train All the Things — Display

Continuing my project with things I know the PyPortal display was up next. Last year I spent a few weeks playing with the portal to make a badge at Gen Con and had a lot of fun with it. Since that time CircuitPython 5 has been released and the portal now expects a few new modules which were easy enough to download and send to the board. The PyPortal makes it incredibly easy to point at an endpoint to fetch data:

import board  
from adafruit import PyPortalpyportal

pyportal = PyPortal(  
 url=<your url here>,  
 default="green.bmp"  
)

status = pyportal.fetch()  
print(status)

With that small snippet we have our status, and all we need to do is put that in a loop to set the background depending on the bit returned.

import board  
from time import sleep  
from adafruitpyportal import PyPortaltry:  
from secrets import secrets * # noqa  

except ImportError:  
 print("WiFi secrets are kept in secrets.py, please add them there!")  

raisepyportal = PyPortal(  
 url=secrets["signal"],  
 defaultbg="green.bmp"  
)

current = 0

while True:  
 status = int(pyportal.fetch())  
 if status == 0 and status == current:  
     pass  
 elif status == 0 and status != current:  
     pyportal.setbackground("green.bmp")  
 current = 0  
     elif status == 1 and status != current:  
 pyportal.setbackground("red.bmp")  
     current = 1  
 elif status == 1 and status == current:  
     pass  
 sleep(30)

Even though it’s a small snippet I want to point out a couple things. First I’m wrapping the return from fetch in a cast to int. If you use Python, but you are new to CircuitPython this may seem odd. If you don't do this and try to compare a string to an int you're probably not going to get the result you expect. Try it out in a repl and then follow up with CircuitPython Essentials . Also I'm only changing the background if the status we fetch is different than the current status. While repainting the screen is fast, it's noticeable and there's no reason to do it every 30 seconds if nothing is different.

That’s it. Now whenever the endpoint receives an update the portal will see that status change and update the display.

Thanks to Adafruit for publishing the case above. The logo on display is the Jolly Wrencher of Hackaday.

With the endpoint and display done I’m off into the unknown. I’ll be setting up the ESP-EYE to update the endpoint, training the voice model and finally running it all with FreeRTOS.

The code, docs, images etc for the project can be found here and I’ll be posting updates as I continue along to HackadayIO and this blog. If you have any questions or ideas reach out.
Train All the Things — Signaling

After figuring out what I was going to use for my project I started work with things I know. I already had some experience with Cloudflare workers building a home system status page, and Workers K/V makes storing and fetching data quick and easy. I ended up with a simple endpoint that I POST to set a bit after keyword detection, and the PyPortal retrieves that status to determine what to display:

const setCache = (key, data) => SIGNALS.put(key, data);  
const getCache = key => SIGNALS.get(key);async function getStatus(cacheKey) {  
 var serviceStat = await getCache(cacheKey); if (!serviceStat) {  
  return new Response('invalid status key', { status: 500 });  
 } else {  
  return new Response(serviceStat, {status: 200});  
 }  
}

async function setStatus(cacheKey, cacheValue) {  
 try {  
  await setCache(cacheKey, cacheValue);  
  return new Response((cacheKey + " set to " + cacheValue + "\n"), { status: 200 });  
 } catch (err) {  
  return new Response(err, { status: 500 });  
 }  
}

async function handleRequest(request) {  
  var psk = await getCache("PSK")  
  let presharedKey = new URL(request.url).searchParams.get('psk');  
  let statusKey = new URL(request.url).searchParams.get('service');  
  let statusValue = new URL(request.url).searchParams.get('status'); if (presharedKey === psk) {  
  if (request.method === 'POST') {  
   return setStatus(statusKey, statusValue);  
  } else if (request.method === 'GET' && statusKey) {  
   return getStatus(statusKey);  
  } else {  
   return new Response("\n", { status: 418 });  
  }  
  } else {  
   return new Response("Hello")  
  }  
}  

addEventListener('fetch', event => {  
 event.respondWith(handleRequest(event.request))  
})

Nothing tricky happening above, just checking the request, and calling the appropriate function to store or fetch the status bit. With the function deployed to my Cloudflare Worker and verified with some GET and POST calls I was ready to move on to the display.

The code, docs, images etc for the project can be found here and I’ll be posting updates as I continue along to HackadayIO and this blog. If you have any questions or ideas reach out.
A Simple Status Page

I have a bad habit of creating side projects for my side projects.

A couple months ago I switched from running my blog with Pelican and Gitlab Pages to Zola and Cloudflare Workers. I didn’t do a write up on it, but if you’re interested there’s a good post by Steve Klabnik to get you started. It was a surprisingly easy switch, and gaps between writing haven’t been as difficult with the better tools. After getting that setup I read about Cloudflare Workers KV , thought it sounded really neat and started to think about what I might build.

On another project I need to signal between different systems a simple status. Naturally that lead to me building a status page. I setup a Cloudflare Worker that receives POST from N systems, stores the date of the last POST uses that to provide a status when asked.

const setCache = (key, data) => LOCALSTATUS.put(key, data);  
const getCache = key => LOCALSTATUS.get(key);function sleep(ms) {  
  return new Promise(resolve => setTimeout(resolve, ms));  
}

function dateToStatus(dateTime) {  
 var isoDateNow = Date.now();  
 var dateDiff = (isoDateNow - dateTime);  
 if (dateDiff < 180000) {  
  return 1  
 } else {  
  return 0  
 }  
}

async function getStatuses() {  
 const cacheKeys = await LOCALSTATUS.list();  
 while (!(cacheKeys.listcomplete === true)) {  
  sleep(5)  
 } 

 const numKeys = cacheKeys.keys.length;  

 var statuses = []; for (var i = 0; i < numKeys; i++) {  
  var c = cacheKeys.keys[i];  
  var epcDate = await getCache(c.name);  
  var data = {date: Number(epcDate), name: c.name};  
  data.strDate = new Date(data.date).toISOString();  
  data.status = dateToStatus(data.date);  
  data.statusIndicator = getStatusIndicator(data.status);  
  statuses.push(data);  
 }

 const body = html(JSON.stringify(statuses || [])); return new Response(body, {  
  headers: { 'Content-Type': 'text/html' },  
 });  
}

async function getStatus(cacheKey) {  
  var cacheDate = await getCache(cacheKey); if (!cacheDate) {  
    return new Response('invalid status key', { status: 500 });  
  } else {  
   var status = dateToStatus(cacheDate);  
   return new Response(status, {status: 200});  
  }  
}

async function updateStatus(cacheKey) {  
  try {  
   var isoDate = Date.now();  
   await setCache(cacheKey, isoDate);  
   var strDate = new Date(isoDate).toISOString();  
   return new Response((cacheKey + " set at " + strDate + "\n"), { status: 200 });  
  } catch (err) {  
   return new Response(err, { status: 500 });  
  }  
}

async function handleRequest(request) {  
  let statusKey = new URL(request.url).searchParams.get('service');  
  let queryType = new URL(request.url).searchParams.get('query'); 
  if (request.method === 'POST') {  
   return updateStatus(statusKey);  
  } else if (queryType === 'simple') {  
   return getStatus(statusKey);  
  } else {  
   return getStatuses();  
  }  
}
addEventListener('fetch', event => {  
 event.respondWith(handleRequest(event.request))  
})

With that anything that can POST can "check in" with the endpoint. You can see it working here. I also went ahead and wrote a simple systemd service that I can drop on to different machines I want to have report in to the endpoint.

[Unit]  
Description=Regular check in  
Wants=check-in.timer[Service]  
Type=oneshot  
ExecStart=/usr/bin/curl -X POST https://status.burningdaylight.io/?service=JETSON[Install]  
WantedBy=multi-user.targetAnd a timer for the service.

[Unit]  
Description=Run checkin every 2 minutes  
Requires=check-in.service[Timer]  
Unit=check-in.service  
OnUnitInactiveSec=1m[Install]  
WantedBy=timers.target

This was a fun “Serverless/FaaS” experiment that actually let me know my ISP was having an outage one morning before work. I’ve used other Functions as a service on other cloud platforms and while they all provide slightly different functionality (For instance Cloudflare being a CDN and the V8 isolate setup) Cloudflare Workers has been really easy to work with and a lot of fun to build experiments on. They even have a web playground that you can start with.

Two things I do wish were easier are interacting with K/V from Rust. This is probably partially related to how new I am to Rust, but working with K/V from JS is super easy, while this thread documents another experience with Workers and Rust in more detail. Another mild annoyance is working with different workers from the same machine and how API keys are handled. There are some suggestions for this, but non of them feel ergonomic at this time. Other than that my experience with Workers and K/V has been great and I’ve already got more ideas for future experiments.

The code, docs, etc for the project can be found here. If you have any questions or ideas reach out.

Train All the Things - Planning

Earlier this year Hackaday announced the Train all the Things contest. I immediately knew I wanted to submit something, but figuring out what to build took me a little bit. For my side projects I like to make something that is useful to me, or somebody I know; while also learning something new. A few days after the contest was announced my daughter was in the basement playing outside my office/homelab when I remembered my wife had asked me if there was a way for her to know when I was working with somebody so that they could avoid coming down in the basement. I thought a voice driven display could be a fun solution.

Choosing Tools

After deciding on the project the next thing I wanted to figure out was what new boards I would need (if any) and how I would build my model. After doing some research I landed on Tensorflow as my path forward for deploying a model to a microcontroller. Having used Tensorflow the barrier for model creation is a bit lower, but I am really curious about Tensorflow Lite and the potential it provides. Additionally a relatively new book TinyML looks like a good resource to use along the way.

After settling on TF Lite the next thing was picking a board. Most of my embedded experience has been with CircuitPython and Rust. For this project I thought it would be fun to learn something new. The Espressif ESP-EYE caught my eye as an interesting board known to work with TF Lite. I’ve seen the ESP32 and 8266 in a lot of other projects, so learning the ESP toolchain seems valuable. Additionally a lot of the Espressif ecosystem seems to be built around FreeRTOS which provides a whole other avenue of learning and hacking.

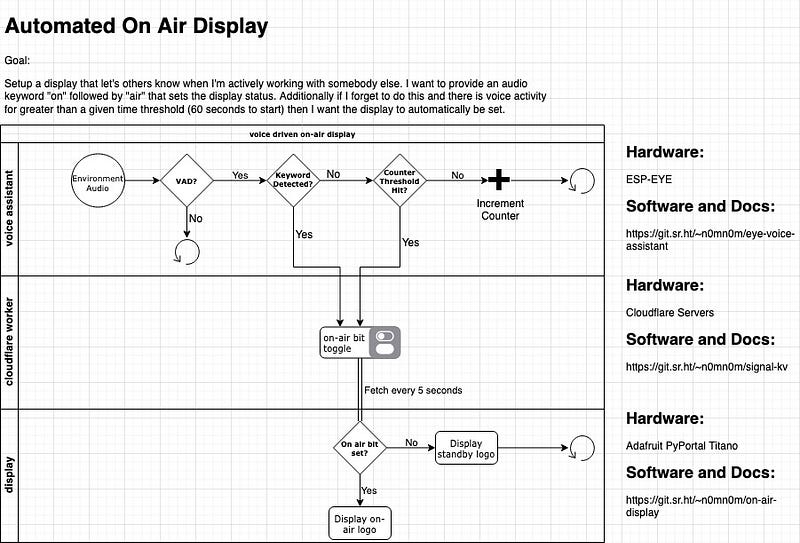
Finally I will need a way to let somebody know when the model has picked up voice activity, to signal that I’m currently busy in the lab. The ESP32 has a WiFi chip providing the ability to send and receive signals via TCP if we want. The ESP-EYE has that built in, and I happend to have a PyPortal (with an ESP32) that could make a great display checking for a status using WiFi too. To signal from one to the other I decided to have some fun and use Cloudflare Workers K/V to set a bit from the ESP-EYE that would be read by the PyPortal at a given time interval to set the display.

Putting it all together the initial idea looks something like this:

Which allows me to have a small board in my homelab listening and the display above the stairwell where somebody can get a status update before they ever come down.

The code, docs, images etc for the project can be found here and I’ll be posting updates as I continue along to HackadayIO and this blog. If you have any questions or ideas reach out.

Create and Apply a Git Patch

I’ve been using Source Hut as my primary host for source control and builds for a few months. I really enjoy it, but one of the main things I had to learn up front was how to apply a patch in git. Unlike Github and many other git host Source Hut makes use of the git patch work flow instead of PRs. At first I found this to be a bit frustrating, but I’ve actually come to see the value in the email and patch workflow that is different from the IM and PR work flow that many of us are used to. Hopefully this helps somebody else that is learning to use patches in the future.

Build your feature or modify your code on a separate branch:

git checkout -b ...  
git add ...  
git commit  
git push

Prepare a patchset:

git format-patch main

Alternative for a patch directory

git format-patch main -o patches

Or login and find the link to download the patch:

curl -O https://github.com/n0mn0m/circuitroomba/commit/ae635ce6533e33ff5277a0428a59c736a98649d6.patchls | grep ".patch"  

Switch back to main:

git checkout main

Check the patchset changes

git apply --stat ae635ce6533e33ff5277a0428a59c736a98649d6.patch

Check for errors

git apply --check ae635ce6533e33ff5277a0428a59c736a98649d6.patch

Assuming the above command doesn’t generate any errors you are ready to apply a clean patch. The git amcommand below includes the --signoff flag for others to view.

git am --signoff < ae635ce6533e33ff5277a0428a59c736a98649d6.patch

And with that the patch has been applied to your main branch. Run your test again for sanity sake and push main.

(define zero(….))

A couple weeks ago I had the opportunity to attend the SICP course taught by David Beazley. I’ve written a short summary of my experience here (tldr; take the course if you get the chance). While the course as a whole was challenging and an interesting a couple of the exercises stood out to me, and I wanted to take a moment to share them here.

TRUE

At a deep level our computer is operating super fast on a state of ON/OFF with gates that define logic. Because of this it's an area of interest for me in how we express similar logic in our languages and the statement/operator capabilities we can build from that. Towards the beginning of day two we kicked things off by defining our own boolean logic in Racket. Our first step? Defining TRUE and FALSE.

(define (TRUE x y) x)  
(define (FALSE x y) y)(define t (TRUE 0 1))  
't  
(define f (FALSE 0 1))  
'fTake a minute and reread that block, because the first time I did it threw me for a loop. We just passed in the same arguments and got TRUE and FALSE. In Racket, and in this scenario we have defined the behavior of our basic TRUE and FALSE operators. The next challenge we were provided was to implement all boolean logic operators.

(define (NOT x) (x FALSE TRUE))(NOT TRUE)  
'f  
(NOT FALSE)  
't  

(define (AND x y) (x y x))  
(AND TRUE FALSE)  
't(define (OR x y) (x x y))  
(OR FALSE FALSE)  
'f  
(OR TRUE FALSE)  
't  
(OR FALSE TRUE)  
't*;;

Hint: x is not just TRUE/FLASE above. It is a procedure, it takes two arguments. And we now have our own set of truth tables.

Defining Zero

Before working on boolean logic we had been discussing the substitution model of evaluation and what you could express with it. After our truth searching exercise it seemed like looking at how numbers could work might be fun.

(define zero (lambda (f) (lambda (x) x)))  
(define two (lambda (f) (lambda (x) (f (f x)))))  
(define three (lambda (f) (lambda (x) (f (f (f x))))))

Defining numbers as symbols for the application of a function N times then let us implement addition:

(define (plus a b)  
 (lambda (f) (lambda (x) ((a f) ((b f) x))))  
 )(define five (plus two three))

Or to make it concrete

(define (inc x) (+ x 1))((five inc) 0)  
'5

Numbers are weird and amazing. Ever since I realized that anything we can express in a program (that I’m writing in letters and symbols) can be boiled down to a series of 0s and 1s that were ultimately symbols that could be swapped out I’ve been captivated by the question of what numbers are. We did other interesting and exercises (mutation, building an interpreter, a register machine VM, and generic types), but something about the above left me considering the nature of logic and programming. It’s easy to get lost in the day to day problem solving, but when we get the chance to step back and look at the strangeness of what we are interacting with it can be a lot of fun. Here’s one last thought to have some fun with:

Always returns false, except for zero, because zero says don't do the function so we get back true

(define (zero? n) ((n (lambda (x) #f)) #t))

The Structure and Interpretation of Computer Programs in 2020

Last week I had the opportunity to attend a course by David Beazley on SICP (The Structure and Interpretation of Computer Programs). SICP is a book that was first published in 1985 and has grown to have a bit of a reputation in various circles of software engineering. The book itself explores many areas of computer science with a language called Scheme ( a lisp). For the course we made use of Racket and Python to explore those same concepts working through the book with an eye to it’s impact on modern language and design.

A quick note. This course was unlike any other I have been in so far. David is really good at giving learners the time and space to think as he lays out really dense material and like a tour guide provides interesting insights about the landscape. Another great part of the class was the size and how Dave gives people time to engage each other. Each morning we shared ideas, experiences and other stories over breakfast before throwing ourselves into the material breaking for lunch to contemplate what we had just built or discovered rounded off with an afternoon coffee. Overall this was a fantastic educational experience and I hope I get the opportunity to repeat it with some of Dave’s other courses in the future.

Throughout the week we engaged with various problems in the book such as evaluation models, abstraction, symbolic data and more. Each time we approached a problem we were encouraged to think as language designers and implementors rather than language users. In doing so we put ourselves in a different state approaching problem solving by extending the features of our language. This led us to implementing object hierarchy and evaluation models, dispatching state handling and creating custom interpreters with domain specific features to solve problems.

One part of SICP book that stood out was the use of ‘wishful thinking’ as our programming model. We would look at a problem (for instance a constraints issue for assigning tenants to floors) and ask ourselves what a procedure or feature would look like for accepting the data and solving said problem. We would then implement this procedure and even mock calling other procedures that did not exist yet to model what we felt like an optimal interface might look like. From there we would build down implementing each new layer with wishful thinking. This came in contrast to a lot of my day to day experience approaching problems bottom up implementing low level details and data processing logic on our way to an isolated solution. In some ways it felt similar to TDD if you mock out all the functionality you don’t have yet, but again with the top down mindset of I want the langauge to do X for me.

Many other topics are covered throughout SICP. The book itself is very top down starting with the language and going all the way down to implementing a VM/register machine by the end of the book. Over time I may write some more about those topics. All in all the course was incredibly interesting. The conversations around lunch about the nature and philosophy of computing were a lot of fun and spawned by the material being covered as well as the various backgrounds we all had in our day to day work. You don’t leave the course with a new package or framework in your toolbelt. Instead you’ve examined of of the underlying fundamentals of languages, computing and software. This equips you with new models for thinking that will hopefully impact any future computing that you take part in. While the material is dense I think anybody that truly enjoys engaging with our craft would benefit from engaging with the SICP material in this setting.

If anybody has questions about the course I’d be more than happy to talk about the material. For those of you who don’t know David Beazley I would encourage you to visit his site or search his name on YouTube as he has a lot of interesting material that encourages the learner to engage the material.

Kicking off Hardware Happy Hour 2020

Last year we kicked off the first Hardware Happy Hour in Louisville Kentucky, USA. We had a lot of fun sharing our projects with each other and hearing about all the things being built in our own back yard. If you’re building something you should try looking for an event in your area as more and more are popping up around the world.

Circuit Playground Workshop

This year we wanted to start things off by inviting everybody to build and learn together with the Circuit Playground Express. On January 29th we got together 15 makers and hackers to have some fun with Arduino and Circuit Python making LEDs blink and speakers buzz. To kick things off Auystn introduced the group to the Arduino IDE, getting it to recognize your board setup, and receiving feedback via the serial console. As with any workshop we had plenty of fun figuring out why this and that didn’t work on whatever OS, but in many ways I think that was exposure for those new to working with the boards and tools that unexpected behavior may occur, but we can find a solution.

Once everybody had a board up and working Austyn spent some time getting everybody comfortable with the Arduino syntax and constructs. That turned into showing how to make some noise followed by a quick on/off switch demo. With a couple more code demos and showing off the Arduino code library we decided to switch gears and look at Circuit Python before having some general open make time.

With Circuit Python we had the same demos with a different approach. Instead of using an IDE and editor we showed how you could put the board into bootloader mode and drag and drop the UF2 and code files directly on the board for loading. Along with that we demo’d the ability to use REPL driven development on the boards for quick prototyping and feedback.

Armed with Arduino and Circuit Python we decided it was time for us to step back and let people hack. Some had fun with accelerometer libraries while others scanned colors and lit up LEDs. By the end of the night I was rick rolled by a Circuit Playground.

More photos from the event here

Louisville Hardware Happy Hour 2020

As 2020 continues we have 3 more H3 events planned in Louisville. Similar to our 2019 event we are planning to have a Q2 and Q4 social. If you’re in the area we would love to see or hear about your project over some food and drink at Great Flood. In Q3 we are hoping to acquire some scopes to run a scope tutorial making use of the Circuit Playground boards and teaching attendees how they can see their programs in a new way.

Sponsors

We (Austyn, Brad and I) want to give a huge shout out and thank you to the Louisville Civic Data Alliance. Without their support and sponsorship we would not be able to provide boards for all of the attendees to use. They have helped us kickstart a set of hardware that we can use to drive future workshops and education experiences. Thank you for providing us with the Code.org Circuit Playground Express Educators’ Pack.

Thank you to LVL1 for hosting. LVL1 is an amazing local resource in the area. If you haven’t checked it out you should definitely try to make it to one of the Open Meeting and Making events on Tuesday nights.

Thanks to Tindie for some awesome stickers and swag.

And thank you to the various code.org donors who made the Adafruit Educators Pack possible for us to purchase and use.

Sponsorship Assistance

As I previously mentioned we are looking to run a scopes workshop this fall. If you or an organization you know is interested in sponsoring this event we are looking for help in acquiring digital scopes to provide attendees with. If you are interested in helping please reach out.

Where to follow

To keep up with future H3 Louisville events we have a group setup on gettogether.community and we are active in the #hardware channel for Louisville Slack.

Events will also be published to the Louisville Tech and H3 Louisville calendars.

You can find our code and presentations on Github.

Connected Roomba - Managing State

Last year I started work and completed the first prototype for managing a roomba via sms and radio. Overall the prototype was a successful, but over time highly unreliable in the face of failure. Most of this came down to state management for the API endpoint and the Roomba OI (Open Interface) code running on the Feather. This week I had the opportunity to sit down and fix some of that.

The latest version of the project can be found here.

Roomba

In previous version of the application that ran on the Feather listening for messages over radio I had managed the application state in this class:

class OpenInterface:  
 def init(self, txpin, rxpin, brcpin, baudrate=115200):  
 self.board = busio.UART(txpin, rxpin, baudrate=baudrate)  
 self.txpin = txpin  
 self.rxpin = rxpin  
 self.brcpin = brcpin  
 self.brcpin.direction = digitalio.Direction.OUTPUT  
 self.baudrate = baudrate  
 self.stopped = True

I had done this so that I couldn’t send the Roomba signals that were invalid for a given state based on the Open Interface documentation. The circuitroomba project were I originally implemented this actually did a lot more state management. Overall maybe this would be helpful during application development, but I found it made code on the board unreliable due to the size of the class object in memory and other work going on causing the board to eventually crash over an extended period of time.

The more I thought about this I also realized I had caused an even larger issue. The Roomba itself manages state internally. It has all of the logic laid out in the OI document impelmented internally keeping things “safe” and tracking if a given signal is valid or not. By adding my own state management layer on top of this I opened the door for all kinds of trouble. First if the internal Roomba logic differed from the OI documentation, or I implemented the OI logic incorrectly I would be sending the application developer down all kinds of paths trying to figure out why state transistion and command signals were not exhibiting the expected behavior. Why setup 2 FSMs when one will do, and only one ends up being the true dispatch? If we did this at the sms API layer we could have 3, all with the potential for bugs, unexpected behavior, logic mismatches, timing issues etc. It’s a combinatorial explosion of state management issues.

So stepping back, considering the separation of concerns I determined all the board needed to do was listen for a given signal flag and pass that on to the Roomba. From there the Roomba can determine if the signal should be acted on based on it’s internal state.

The new implementation discards the class object and instead just uses a super loop and signal functions.

while True:  
 try:  
 packet = rfm9x.receive(1) if packet is not None:  
 packettxt = str(packet, "ascii")  
 print(packettxt) if packettxt == "0":  
 commandreceived(led)  
 led.value = True  
 stop(bot)  
 led.value = False  
 elif packettxt == "1":  
 commandreceived(led)  
 wakeup(brc)  
 start(bot)  
 led.value = True  
 else:  
 print("\nUnknown packet: {}\n".format(packettxt))  
 except:  
 pass

Additionally from time to time signals can have issues that previously caused hanging in the application. Now the logic inside the super loop is wrapped in a try/except to prevent corrupt date from completely crashing the application. Instead failures are ignored and we keep listening for the next signal. While this isn't always a viable solution in the case of signaling the Roomba the stakes are low and this is something I'm comfortable with.

Pi Zero

After fixing up the Feather board code I moved onto the Pi applications. Previously I had setup a Flask application to act as the SMS webhook for Twilio. This worked pretty well and was consistent over time, but there was the occasional hang running on the Zero that led me to look into managing the Python and Ngrok application with systemd. Converting from crontab was fairly easy. I created a few *.service files and placed them in /etc/systemd/system.

[Unit]  
Description=sms listener  
After=ngrok.service[Service]  
Type=simple  
User=pi  
WorkingDirectory=/home/pi  
ExecStart=/home/pi/.virtualenvs/lora-pi/bin/python /home/pi/projects/roombasupervisor/smslistener.py  
Restart=on-failure[Install]  
WantedBy=multi-user.target

Once the files were created I ran the following commands:

systemctl enable smslistener.service  
systemctl start smslistener.service

And now all of the required applications (ngrok, sms listener, button listener) are managed by systemd. This controls their startup better than the previous crontab setup and has the added benefit of restarting the service if it fails our.

Wrapping up

By observing and understanding the ways in which the prototyped system failed I was able to identify areas where behavior and functionality could be simplified resulting in an overall more reliable system. If you have any other tips to share reach out and good luck hacking.

Parsing Time with Python

I recently had the need to measure time and performance on an application that interacted with a lot of on disk files. Most of the time when talking about timing and measurement in Python we see the use of timeitand various built in timing techniques. For this work I wanted a little more information about how the application was interacting with the system, and what the performance looked like from outside the application. Getting a rough view of this is pretty easy on a nix using /usr/bin/time.

Parsing Time

To make use of time you simply call it with your application as an argument. You can find the time args with man time, but on useful one is the -v flag for more system information in the output, and an --output file path. Doing this you get a fair amount of page, time and system information in your output packaged up in a file that you can parse. In my script I'm also including some information in the file name so I can know what source file my application was parsing relating to that time information.

#!/bin/bash

SRCDIRPATH=/data  
RESULTS=/profilefor file in $SRDDIRFILES; do  
 filename=$(basename -- "$file")  
 filebase="${filename%.*}"  
 echo $filebase  
 /usr/bin/time -v --output=$PROFILERESULTSDIR$filebase.txt cmd args  
 echo "done"  
donels -1sh $SRCDIRPATH &> profileddirectory.size

Once the application has ran you can see the output of time in your file, but you will also probably notice that it’s just a text blob not ready for aggregation. Overall parsing time is relatively straight forward with one gotcha. I use the below to translate the blob into rows and columns:

import os  
from typing import Tuple, List, Any, Union  

def formattimeprofileoutput(fpath, fobject) -> List[Any]:  
 """  
 Takes a directory of files containing the output of /usr/bin/time  
 and transforms the time blob data to a series of rows and columns.  
 """  
 f = os.path.join(fpath, fobject)  
 timemetrics = [fobject] with open(f, "r") as tfile:  
 for line in tfile:  
  if "Elapsed" not in line:  
   cleanline = line.lstrip()  
   metric, sep, value = cleanline.rpartition(":")  
   timemetrics.append(value.strip())  
  else:  
   # Handling the special case of the Elapsed time  
   # format using : in the time formatting.  
   cleanline = line.lstrip()  
   metric, sep, seconds = cleanline.rpartition(":")  
   # we now have something like val = 43.45  
   # metric = Elapsed (Wall Clock) time (H:MM:SS or M:ss) 1  
   # partition again on metric, then combine back our time.  
   metric, sep, minutes = metric.rpartition(":")  
   # put time back into metrics  
   value = f"{min}:{secs}"  
   timemetrics.append(value.strip())  
   # setup tool second metric for easier evaluation of  
   # time metrics  
   minutes = float(int(minutes) * 60)  
   seconds = float(seconds)  
   seconds += minutes  
   timemetrics.append(seconds)  
 return timemetrics

Notice the one edge case in Elapsed (wall clock) time...). All other rows end with \n and seperate the metric name from the value with :. Elapsed wall clock time however throws in a couple extra colons for fun. Overall not a big deal, but a little gotcha waiting in the details when going from a string to another object/format.

Using the script above you end up with a collection of rows and columns that you can then use to find out how your application performed for that run instance.

A quick bonus script, since my application was reading in and writing out new files I wanted to include the size of the input files so I could begin to understand the impact of the input file size on the applications time metrics.

import osdef formatsizeoutput(fpath, fobject) -> List[List[str]]:  
 f = os.path.join(fpath, fobject)  
 sizemetrics = [] with open(f, "r") as sfile:  
 for line in sfile:  
 metric, sep, filename = line.rpartition(" ")  
 sizemetrics.append([metric.strip(), filename.strip()])  
 return sizemetrics[1:]

With this and the above time parsing we have the input file size, name, application command, page and time information. More than enough to begin looking at what our application is doing from the outside.